Yes, you can have a garden, even if you only have a few square feet available. The secret: Think outside the row.
A garden produces more food than most people realize. Vine veggies can be grown vertically; deep-rooted plants like corn can grow against shallow-rooted lettuce, with neither minding the crowding. Even if all you’ve got is a balcony, you can grow strawberries without using floor space. It takes effort, but remember that all the hard work of gardening comes at the beginning. Once it’s done, all that’s needed is light maintenance: watering, fertilizing and weeding.
Here’s how to make the most of your space, build a composter for less than $30 and construct a season-extending greenhouse.
|
|

|

|

|

|

|

|
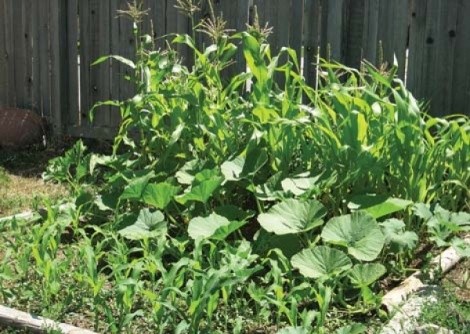
The 4-by-8-foot garden
You’ll need three 8-foot landscape timbers, one cut in half (the store will usually cut it for free), a shovel, rake and trowel.
Place timbers to form a rectangle. Till the soil inside, clearing weeds and rocks as you go. Digging up such a small space with a shovel isn’t really that hard. Rake it smooth, then water thoroughly. Let the earth settle for several days.
In this small plot, begin with the “three sisters”: corn, beans and squash. The name comes from the mutual cooperation of each plant. Corn, a heavy feeder, uses up nitrogen in the soil. Beans grab nitrogen from the air and release it from their roots, thus replenishing the soil. As the beans grow, they use the corn stalks for support, eliminating the need for poles. Meanwhile, the squash leaves shade the ground, preventing it from drying out and stopping weed growth. Cucumbers or melons can be substituted for squash, but you’ll have to direct the vines back into the garden when they get long.
Plant three rows of corn down the length of the rectangle, one at each side, one down the middle. Place seeds four inches apart in each row. When the sprouts are 2 inches high, plant bean seeds between every other corn sprout. If there’s an empty space where a seed didn’t germinate, replace it. Once the beans get their second set of leaves, plant squash, melon or cucumber seeds between the rows of corn, but make stepping stones in the middle so you can walk inside the plot.
Meanwhile, start lettuce seedlings in a sunny window. Once they’re about an inch high, transplant them into the garden wherever there’s space.
Cheap quick composter
You’ll need a plastic garbage can with a snap-on lid (about $15), two small bungee cords, and a 1-inch hole saw (about $8 at most hardware stores).
With the hole saw on your drill, begin drilling holes about a foot apart all around the can and on the bottom. Drill one hole in the center of the lid. Toss in your compost materials and wet them thoroughly. Snap on the lid, and adjust the bungee cords so they hook onto the lid’s center hole and under the rim of the can, firmly holding the lid on.
Lay the garbage can on its side. Every few days, roll the can to aerate the compost. Add water through the holes. Use one or more utility buckets to hold new materials until the stuff in the can disintegrates into compost. Meanwhile, materials in the buckets will begin the composting process. Wet them down frequently.
The 6-by-10-foot season-extending greenhouse
You’ll need a roll of 4-mil, 10-feet-by-25-feet plastic sheeting, 12 pieces of 3-foot-long rebar, 16 10-foot lengths of 3/4-inch PVC pipe, 12 or more PVC three-way connectors and a hacksaw—-but no glue.
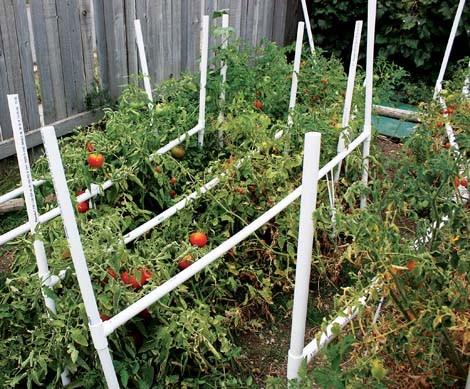
Start by sawing 12 lengths of PVC into thirds so each piece is 20 inches long. Saw the other four lengths in half, making 5-foot-long pieces. Next, hammer the rebar 18 inches into the soil. Place the rebar in rows 18 inches apart along the 6-foot length and five feet apart along the 10-foot width. Place a 20-inch piece of PVC over each piece of rebar—-this will hold the framework down. Next, top each piece of PVC with a connector, then add another 20-inch piece of PVC. Put 5-foot lengths of PVC into the middle connector holes to make each row one long line.
Use this frame to stake tomatoes, growing them vertically. Save space by planting them only two feet apart. Plant dill and lima beans between tomatoes; these three crops need less water than the “three sisters.”
When the weather turns cold, spread plastic over the frame, waterproofing seams with duct tape. Weight the edges of the plastic to the ground with rocks. When your crops are finished, fold the plastic, pull the frame apart and use again the following season.
PVC strawberry planter
You’ll need a 1-inch hole saw, a 1/2-inch drill bit, a 4-inch-wide length of PVC pipe, an end cap, a length of 1 1/2-inch PVC drainage pipe, gravel, PVC glue, two-inch screw and nut, three feet of wire, an “S” hook, soil, strawberry plants and a drill.
Cut the pipe and drainage pipe into three-foot lengths. Drill a 1/2-inch hole in the pipe one inch down on each side of the “top” of the planter. With the hole saw, drill three evenly spaced holes five inches from the “bottom” of the pipe. Eight inches above those, drill another three holes, spacing them so they’re not above each other. Continue drilling holes around the pipe at eight-inch intervals; stop three inches below the small top holes.
Using the 1/2-inch bit, drill a hole in the center of the pipe cap. Drill four more holes in the cap. Sandpaper rough edges. Place the screw in the center cap hole and tighten with the nut. Glue the cap to the bottom. Fasten wire through the half-inch top holes and tie a loop on top. Place drainage pipe into planter, over the screw. Fill drainage pipe with gravel.
Keeping the drainage pipe centered, fill the outer pipe with soil up to the bottom row of holes, tapping planter on the ground to settle the soil. Insert the roots of a strawberry plant into each hole. Add soil up to the next row of holes, tapping again to tamp soil; insert more plants. Continue until holes are filled. Put the “S” hook through the loop and hang planter.
Water by pouring water into the drainage pipe until water drips from the bottom cap holes. Strawberries will die back in winter but return each spring.